So, you just bought a new PC or Laptop with Windows 8 operating system,
and wondering how to set PATH and Classpath on Windows 8; Or, you might have just
upgraded your windows 7 laptop to professional edition of Windows 8 and looking
to set JDK Path to compile Java programs. Not to worry, this is second step for
any one who wants to learn Java programming. Of course, first step is to
install JDK. In this Java tutorial, we
will see step by step guide to set Java PATH
and CLASSPATH in Windows 8 operating system. By the way, if you are learning
Java in Windows 7 operating system, You should still be able to set Java path
and classpath in Windows 7 by following steps given here, because navigation
steps for modifying environment variables on Windows 7 and Windows 8 are almost
same.
For absolutely Java beginners, It's important to know What
is Path Environment variable and Why do you need to set Path for Java? PATH is an environment variable, which contains location of executable or commands.
When you type a command in command prompt, Operating System like Windows 7 or
Windows 8, looks PATH to find and execute
that command. Actually for running
Java program, you don't need to set PATH because Windows 8 comes with
bundled JRE
which is sufficient for running Java applications. Setting PATH simply means including
JDK bin directory into PATH environment variable. You need to set PATH to
compile Java source code and create Java
class files. JDK bin directory contains javac and java commands to compile and run Java programs.
CLASSPATH is little different than Path and it's used by JVM
rather than Operating System to load
classes at runtime. I suggest reading difference between Path and Classpath
and How
Classpath works in Java and to know more about these fundamental concept.
Setting JDK Path and Classpath in Windows 8
and Windows 7
This tutorial assumes that, you know how to download and Install JDK in
Windows 8 machine. By the way if you are absolutely beginner and just starting
with Java, then it's important to download correct version of JDK based upon
whether you are running 32-bit or 64-bit version of Windows 8. See How to
install JDK 7 on Windows 8 operating System to learn more about installing JDK
in Windows 7 and 8. Once successfully installed, it's time to set PATH and
Classpath for Java. By the way, If you know how
to set PATH in Windows XP, then this would be very easy for you.
Steps to set JDK Path and Classpath in
Windows 7 and Windows 8
Before setting JDK Path, let's first verify Type javac in command prompt
in windows 8 and see output, if you get javac is not recognized as an internal
or external command, means JDK Path is not set.
1. Confirm that PATH is not set for Java by typing javac in command
prompt.
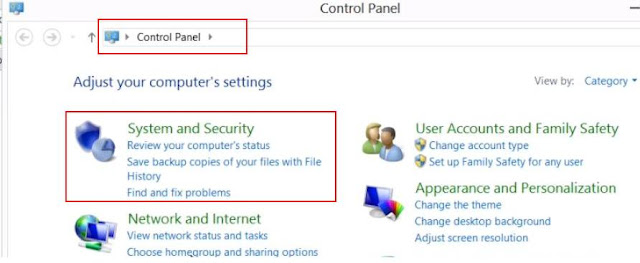
2. Open Control Panel and Select System and Security
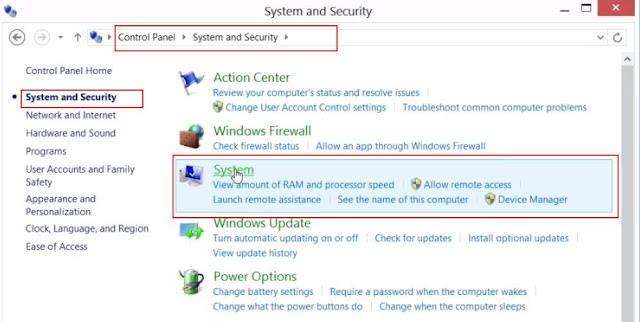
3. Select System
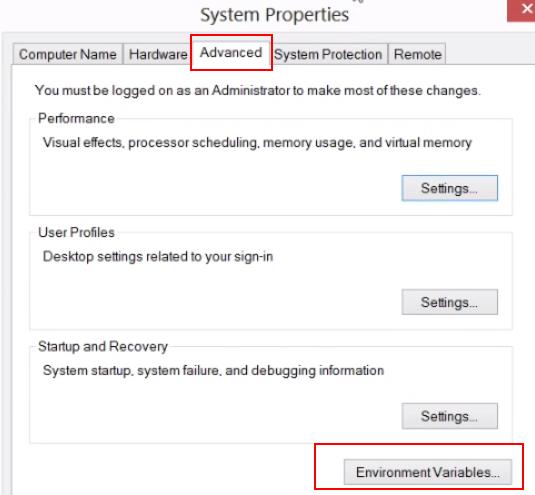
4. Select Advanced System Settings
5. Select Environment Variables
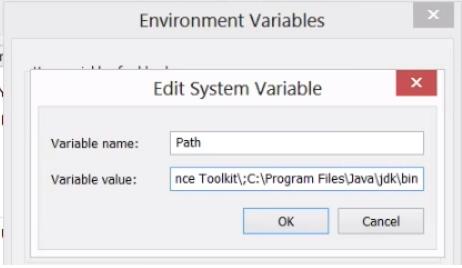
6. Select and Edit Path Environment variable
7. Verify Java path by typing javac in command prompt
Step 1 : Open Control Panel in Windows 8
Step 2 : Select System
Step 3 : Select Advanced System Settings in Windows 8
Step 4 : Select Environment Variables
Step 5 : Select and Edit Path Environment variable in Windows 8
Step 6 : Verify Java path by typing javac in command prompt
just type javac command, this time you will see different output which shows various details of java command rather than getting earlier error.You can follow similar process to set Classpath in windows 8 as well. But
it’s not a good practice to use CLASSPATH environment variable to run Java
application, instead every Java application should use –classpath option to
specify classpath. You can also see How
Classpath works in Java for more details on Java Classpath.
Now you are ready to write Java code and compile and run them. Why not
just try with HelloWorld Java program. By the way to know more about PATH and Classpath,
which is essential for Java developers, See following tutorials


Tidak ada komentar:
Posting Komentar