Minggu, 30 November 2014

Grazing In The Nanograss Is A Gas: New "Nanopillars" To Improve Solar Cells

Sometimes when science takes a page from nature, great ideas abound.  Such is the case with the new "nanograss" design, which improves the energy-gathering capabilities of solar panels.

According to neomatica.com, researchers used the concept of blades of grass to expound on collecting available solar power.  When blades of grass grow, their surface area is multiplied by their height, and their vertical growing pattern makes it easy to have a large number of blades in a small area.  This makes for an accrued larger surface area that can absorb (and, in turn, convert) more sunlight when the design is applied to solar panels.

The new "nanograss" is created from nano-crystalline material with photovoltaic capacity.  On the atomic scale, at billionths of a meter tall, the cell stacks or "nanopillars" appear similar to a neatly-trimmed lawn of grass.  Each blade is a column of semiconductor p-n junctions which react with 32% more efficiency than traditional thin-film photovoltaic cells.

Professor Briseno of UMass Amherst, the lead author of the study, claims, “This work is a major advancement in the field of organic solar cells because we have developed what the field considers the ‘Holy Grail’ architecture for harvesting light and converting it to electricity.”

The biggest challenge of the project was to enable the molecules to stack vertically so that their electrons could flow as needed, bearing charge in only one direction. The substrate grapheme was found to be the solution that allowed the molecules to stack properly, bringing the idea to actualization. The results may soon be used in batteries and transistors as well as solar cells.

Of course, nano-pranks were quick to follow on the nano-lawn.
(Image courtesy umass.edu.)


Source:http://blog.agupieware.com/2014/10/grazing-in-nanograss-is-gas-new.html

Don't Mess With Texas's Ebola-Killing Robot

It's like the Terminator...for the Ebola virus.

In light of the United States appearance of Africa's Least Wanted menace, a robot that can kill the Ebola virus using UV light has hit the market.  As reported by wtsp.com, the robot known as "Little Moe" sanitizes possible outbreak locations by blasting UV light to fuse and thus destroy the virus's DNA.  A xenon bulb flashes at 1.5 times per second - enough to clean a whole hospital room in five minutes, or to scrub an Ebola-tainted surface in two minutes.

The robot, developed by the Texas company Xenex, is now a feature of 250 hospitals nationwide.  Dr. Mark Stibich, who works with Xenex, explained, "...What our customers have seen and reported in the medical literature is reduction in these infections in the rate of up to 50 percent."

Shine on, Little Moe.

It also serves as party lighting for your "I Survived Ebola" celebration bash...if you make it.


Source:http://blog.agupieware.com/2014/10/dont-mess-with-texass-ebola-killing.html

10 Programming Best Practices to Name Variables, Methods, Classes and Packages


What's in name? "A rose by any other name would smell as sweet" is a famous quote from William Shakespeare's classic Romeo and Juliet, but sorry to say, name matter a lot in programming and coding.  It's also said that code is the best document for any software, because any other document or comments can become outdated quickly, but code will always tell you truth; If code is then best document than names are most critical element of it. Every effort, small or big, invested while naming variables or methods, pays in both short term and long term. In fact, if you ask me just one coding practice to follow, It would definitely recommend giving meaningful names to your variables and methods. One reason, I push for this coding practice is because it improves readability of any algorithm or program drastically. Since every programmer spends more time reading code than writing, It would make a lot of sense to give meaningful names to your programming element. Readability is also one of the most important aspect of clean code. If you happen to read Clean code, the book by Uncle Bob, you would have seen a whole chapter on meaningful names, this just shows how important it is to name your variable, methods, classes and packages properly. Though these programming best practices are given from a Java programmer's perspective, they are equally useful in any other programming language. In fact, most of them are independent of any programming language and can be used while writing bash script, SQL stored procedures, C++ code and any other computer program. In fact you will value these practices more in case of shell script and database stored procedure because they don't have tools as smart as Java IDEs.


Java Best Practices of Proper Naming Convention


Programming Best For Naming Variables Methods and PackagesHere are some of the programming or coding best practices professional Java developer follow while writing code, including myself. Most of these practices are common sense and acquired via years of experience of reading and writing code. It not just include best practices but also bad practices to avoid, because what not to do are equally important as what to do. At the same time, this list is by no means complete and if you have any other good practice while naming programming elements, feel free to share. Perfection is a journey and everyday we learn something important. So what are we waiting for, let's see better way to name your variables, methods, classes and packages in a computer program.


1) Avoid Pointless Names

Pointless names e.g. variable names as abc, temp, data etc doesn't reveal intent, they simply reduce readability. They are best suited for writing test programs, short demo and not more than 50 lines of code. You should never use pointless name in your routines in a professional project. Why? because test programs are not maintained but a real project is maintained for years, only you work on test programs but many developers work in a professional project.


2) Give Meaningful Names

This is counterpart of first coding best practice. Instead of pointless names, provide meaningful names, which reveals intent of programmer. For example method name with getPayDate() is much better with gpd() or getPD() because if I read getPayDate() somewhere in my code, I would know that this method is going to return me pay date, even after several years, but same cannot be said for gpd() or getPD().  One programmer was arguing with me that he will not follow this principle with private methods because private methods are only accessible in the class and anyone can see their definition. He might have half point there but it will not help, because best practices are habits and takes long time to develop. If you don't follow them always, you are more like will not follow even when you need them. Also if your class is more that 400 lines long, going back and forth to see definition will only irritate you to re-factor that method after some time.


3) Prefer shorter name over longer one, if it reveal intent clearly.

I love to use short name for my methods but only if it's complete and reveal programmer's intention clearly, for example between getPayDate() and retreivePaymentDate(), former is better than later. Since both are able to reveal purpose, shorter ones are easy to read and write, but don't forget to follow Java bean naming convention e.g. if variable name is payDate then getter method name must be getPayDate(). By the way here I am tossed between jQuery like method than Java's bean convention. I really enjoyed using methods like text() which return text (without argument)  and overloaded version text(data) (with argument) which changes text.


4) Avoid Similar Names

Nothing is worse than similar names, for example having two variables employee and employees, has every same character except last one. This kind of differences are very hard to spot, and often leads to subtle bugs, which are even harder to find during code reviews. If you have to represent a collection or plural, prefer something like listOfEmployees, bunchOfEmployees over employees. By the way, be careful while using names which represent programming concept e.g. List is a ordered collection in Java, so some Java programmer may think that listOfEmployee is a ordered collection of Employee, which if it doesn't, will create misunderstanding.


5) Prefer descriptive name over short form

This is counterpart of our earlier Java naming best practices, where I had argued for shorter names. Disclaimer there was that, shorter name must reveal purpose of variable or method e.g. getPayDate() is fine, but getLInd() is not as good as getLiquidityIndicator(). So prefer shorter name if and only if it reveal intent completely, otherwise choose longer and descriptive name. What is your method is taking lot of character, one reason could be that your method is doing more than one thing e.g. loadAndUpdateAllInstrumentRecords(), you can split this into two methods e.g. loadInstruments() and updateInstruments().


6) Follow Java Coding Convention

If you are writing Java program, then you must follow Java Coding Convention, It's even more important if you are writing open source code. Since Java Coding Conventions are quite common among Java developers, it makes it easy for another programmer to read your code. Some of the most common Java coding convention are:

        - Start name of class as capital letter e.g. Employee, Student or Thread.

        - Start name of method from small character and follow camel case e.g. getEmployee(), getPayDate() etc.

        - Use camel case in variable names as well e.g. price, quantity, totalAmount etc.

        - Use all caps for constants in Java e.g. MAX_QUANTITY, MAX_PRICE etc.

        - follow bean naming convention, because many open source framework use reflection, which works on bean naming convention. For example display tag uses reflection and bean naming convention to show data in table e.g. if you specify name, display tag will call getName() method on table data object.


7) Use Consistent Naming, Avoid Synonyms

This is another naming best practice which can be argued, but consistency overrules any potential argument. Having synonyms for similar methods doesn't harm too much, but it's better to be consistent e.g. instead of having three different methods destroy(), kill(), or finish() at different modules, prefer one of them e.g. destroy(). This will make your API more usable, as programmer will be able to predict and search more easily. It also helps you to keep one functionality at one place and avoid accidental duplication of code, remember DRY (Don't Repeat Yourself).


8) Follow Classical Programming Convention

In first Java best practices of  naming variables, I had said that avoid using pointless names, but there are exceptions e.g. i and j as loop counter in for loop, as shown below.

for(int i=0; i<10; i++){
// your code
}

Programmers are so familiar with that, they would be surprised to see any other name for loop counters. Similarly getters and setters are named like that.


9) In Java, class name should be noun

Your class name should be noun and should tell what does this class represent e.g. Employee, Thread, String etc. Similarly method names should start with verb e.g. get, set, do, invoke etc. Interface name should describe ability or CAN DO part e.g. Runnable can run, Callable can be called etc. package name should follow standard company structure e.g. com.company.project.module. You can find examples of Java package naming convention in several open source project e.g. Apache Commons BeanUtils uses org.apache.commons.beanutils.BasicDynaBean.


10) Avoid Clutters like _, m_, o_

Some programmers tend to use specifies like m_ to denote member variables, or simply _ (underscore) to differentiate member variable with local variables. Avoid doing that because, it looks like clutter. Instead of this you better choose meaningful and unique names. By the way, if your project already uses m_ naming convention, then better stick with it, because it's not possible to rewrite or correct whole project. It's even worse to have different naming convention at different part of code. Similarly, many programmer uses Hungarian notation e.g. bExit for boolean variable, iMax for integer variables. Those are not too bad, if you are working in a legacy code, but if you writing it something from scratch don't use them.


11) Avoid using non ASCII characters and words from local language

Using any character other than ASCII character, especially non English is worst practice. Never use characters from other languages, it might not be supported on all platforms, IDE and different machines. Similarly, don't use words from local languages e.g. Hindi, French or German. English is a universal language for programming and stick with it. It's not guaranteed that next programmer, who will maintain your code, will understand local languages, so better avoid it.


12) Make good use of common verb e.g. is, has, can or do

I found naming boolean variable and methods with is, has, and can improves code readability. Methods like isAlive(), hasNext(), canExecute() adds lot of value. You can use same rule to name boolean variable, which are easy to read when put on conditional statement e.g.

if(isRaining){
bringUmbrella();
}


That's all on Java best practice of naming variables, methods, classes and packages. Most of advice are independent of programming construct and can be used, while writing bash scripts, routines, or SQL stored procedures. Though naming conventions are one of the fundamental aspect of programming, it's often overlooked. Don't satisfy with first go, always try to read your code and strive for more meaningful names, which are clear and reveal intent. Also nothing is as bad as inconsistency, don't mix upper and lower case, Hungarian convention to Java code convention etc. Let us know, what best practices you guys are following while naming variables and methods in Java.


Do you like Best Practices articles? If Yes, then here are some amazing posts for your reading

Exception Handling Practices for Java Programmer

Tired with Null, follow these practices to avoid NPE in Java

JDBC Best Practices for Java Developer

Code Commenting Best Practices

JUnit Best Practices for Java Developers

Java Best Practices to follow while Overloading Methods


Source:http://javarevisited.blogspot.com/2014/10/10-java-best-practices-to-name-variables-methods-classes-packages.html

Generics wildcards Tutorial with examples

Java Generic's wildcards is a mechanism in Java Generics aimed at making it possible to cast a collection of a certain class.

Generics Wildcards

In generic code, the question mark (?), called the wildcard, represents an unknown type. The wildcard can be used in a variety of situations: as the type of a parameter, field, or local variable; sometimes as a return type (though it is better programming practice to be more specific). The wildcard is never used as a type argument for a generic method invocation, a generic class instance creation, or a supertype.

Generics Upper Bounded Wildcards

You can use an upper bounded wildcard to relax the restrictions on a variable. For example, say you want to write a method that works on List<Integer>, List<Double>, and List<Number>; you can achieve this by using an upper bounded wildcard.

To declare an upper-bounded wildcard, use the wildcard character ('?'), followed by the extends keyword, followed by its upper bound. Note that, in this context, extends is used in a general sense to mean either "extends" (as in classes) or "implements" (as in interfaces).

To write the method that works on lists of Number and the subtypes of Number, such as Integer, Double, and Float, you would specify List<? extends Number>. The term List<Number> is more restrictive than List<? extends Number> because the former matches a list of type Number only, whereas the latter matches a list of type Number or any of its subclasses.

Consider the following process method:
public static void process(List<? extends Foo> list) { /* ... 

*/ }


The upper bounded wildcard, <? extends Foo>, where Foo is any type, matches Foo and any subtype of Foo. The process method can access the list elements as type Foo:
public static void process(List<? extends Foo> list) {
for (Foo elem : list) {
// ...
}
}


In the foreach clause, the elem variable iterates over each element in the list. Any method defined in the Foo class can now be used on elem.
The sumOfList method returns the sum of the numbers in a list:
public static double sumOfList(List<? extends Number> list) {
double s = 0.0;
for (Number n : list)
s += n.doubleValue();
return s;
}


The following code, using a list of Integer objects, prints sum = 6.0:
List<Integer> li = Arrays.asList(1, 2, 3);
System.out.println("sum = " + sumOfList(li));
A list of Double values can use the same sumOfList method. The following code prints sum =

7.0:
List<Double> ld = Arrays.asList(1.2, 2.3, 3.5);
System.out.println("sum = " + sumOfList(ld));

Generics Unbounded Wildcard

Sometimes we have a situation where we want our generic method to be working with all types, in this case unbounded wildcard can be used. Its same as using <? extends Object>.

public static void printData(List<?> list){         
for(Object obj : list){
System.out.print(obj + "::");
}
}


We can provide List<String> or List<Integer> or any other type of Object list argument to the printData method. Similar to upper bound list, we are not allowed to add anything to the list.

Generics Lower bounded Wildcard

Suppose we want to add Integers to a list of integers in a method, we can keep the argument type as List<Integer> but it will be tied up with Integers whereas List<Number> and List<Object> can also hold integers, so we can use lower bound wildcard to achieve this. We use generics wildcard (?) with super keyword and lower bound class to achieve this.

We can pass lower bound or any super type of lower bound as an argument in this case, java compiler allows to add lower bound object types to the list.
public static void addIntegers(List<? super Integer> list){    


list.add(new Integer(50));
}

Generics wildcards and Subtyping

Given the following two regular (non-generic) classes:
class A { /* ... */ }
class B extends A { /* ... */ }


It would be reasonable to write the following code:
B b = new B();
A a = b;


This example shows that inheritance of regular classes follows this rule of subtyping: class B is a subtype of class A if B extends A. This rule does not apply to generic types:
List<B> lb = new ArrayList<>();
List<A> la = lb; // compile-time error


Given that Integer is a subtype of Number, what is the relationship between List<Integer> and List<Number>?

Although Integer is a subtype of Number, List<Integer> is not a subtype of List<Number> and, in fact, these two types are not related. The common parent of List<Number> and List<Integer> is List<?>.

In order to create a relationship between these classes so that the code can access Number's methods through List<Integer>'s elements, use an upper bounded wildcard:
List<? extends Integer> intList = new ArrayList<>();
List<? extends Number> numList = intList; // OK. List<? extends Integer> is a

subtype of List<? extends Number>


Because Integer is a subtype of Number, and numList is a list of Number objects, a relationship now exists between intList (a list of Integer objects) and numList. The following diagram shows the relationships between several List classes declared with both upper and lower bounded wildcards.

Type Erasure

Generics were introduced to the Java language to provide tighter type checks at compile time and to support generic programming. To implement generics, the Java compiler applies type erasure to:
  • Replace all type parameters in generic types with their bounds or Object if the type parameters are unbounded. The produced bytecode, therefore, contains only ordinary classes, interfaces, and methods.
  • Insert type casts if necessary to preserve type safety.
  • Generate bridge methods to preserve polymorphism in extended generic types.
Type erasure ensures that no new classes are created for parameterized types; consequently, generics incur no runtime overhead.

For example if we have a generic class like below;
public class Test<T extends Comparable<T>> {       
private T data;
private Test<T> next;
public Test(T d, Test<T> n) {
this.data = d; this.next = n;
}
public T getData() {
return this.data;
}
}


The Java compiler replaces the bounded type parameter T with the first bound interface, Comparable, as below code:
public class Test {       
private Comparable data;
private Test next;
public Node(Comparable d, Test n) {
this.data = d;
this.next = n;
}
public Comparable getData() {
return data;
}
}


MUST READ : Java Generics Tutorial with Examples.

Generics wildcards Tutorial with examples

Hope we are able to explain you basic details of Java Generics, if you have any questions or suggestions please write to us using contact us form.(Second Menu from top left).

Please share us on social media if you like the tutorial.

Source:http://www.tutorialsdesk.com/2014/10/generics-wildcards-tutorial-with.html

Sabtu, 29 November 2014

Inbound Web Service processing using XSL transformation

The title of this article is quite scaring right?
Let's describe the scenario...

You have an external application that needs to query or update data in Maximo using a Web Service call. In the real world the outbound XML schema of the caller is different from the Maximo inbound interface.
How can you transform the incoming request to the standard Maximo Web Service interface?
This article describes how to use XSLT (EXtensible Stylesheet Language Transformation) to transform the inbound XML structure to a MIF-compliant one.

 This diagram describes what we need to achieve.


NOTE: Before starting complete the Maximo inbound Web Services tutorial to have a basic understanding of inbound Web Services in Maximo and setup the prerequisite configurations for this tutorial.


Setup test tool (SoapUI)

Testing the XSL Transformation in Maximo can be really tedious. You absolutely need a tool to test the XSLT code before putting it into Maximo.
There are many tools around. I suggest to use WmHelp XmlPad for Windows or XTrans.


Sample data

In this tutorial I will focus on a sample inbound request to create or update an asset into Maximo. This is the sample XML.

<Import>
<Equipment>
<Equipment>001</Equipment>
<Description>My desc</Description>
</Equipment>
</Import>

We want this incoming XML to be transformed to the following MIF WebService call.

<max:SyncMXD-ASSET>
<max:MXASSETSet>
<max:ASSET>
<max:SITEID>BEDFORD</max:SITEID>
<max:ASSETNUM>001</max:ASSETNUM>
<max:DESCRIPTION>My desc</max:DESCRIPTION>
</max:ASSET>
</max:MXASSETSet>
</max:SyncMXD-ASSET>


Develop XSL Transformation

Now the interesting part...
XSLT is a powerful tool to transform XML structures. I think it is the best technical option to integrate two different systems using Web Services.

I use XMLPad to develop XSLT and test itbut you can use any other tool of your choice.
Now test the following XSL on the sample inbound XML and you will see the magic.

<?xml version="1.0"?>
<xsl:stylesheet version="1.0"
xmlns:xsl="http://www.w3.org/1999/XSL/Transform"
xmlns:max="http://www.ibm.com/maximo">

<xsl:output method="xml" encoding="UTF-8" indent="yes"/>

<xsl:template match="Import">
<xsl:apply-templates select="Equipment"/>
</xsl:template>

<xsl:template match="Equipment">
<max:SyncMXD-ASSET>
<max:MXASSETSet>
<max:ASSET>
<max:SITEID>BEDFORD</max:SITEID>
<max:ASSETNUM><xsl:value-of select="Equipment"/></max:ASSETNUM>
<max:DESCRIPTION><xsl:value-of select="Description"/></max:DESCRIPTION>
</max:ASSET>
</max:MXASSETSet>
</max:SyncMXD-ASSET>
</xsl:template>

</xsl:stylesheet>


Deploy XSL file

When everything is working fine in your local test tool you are ready to set the XSL transformation in the Web Service configuration.
There are two methods to provide the XSL file to Maximo: on the filesystem or in the maximo.ear file.

The first one is simpler. First of all you have to copy the XSL file on the Maximo server. For example D:\MIF\MXD-ASSETES.xsl.
Open the Web Services application (Go To > Integration > Web Services) and select the MXD-ASSETES service created in the first tutorial. Set the full path of the XSL file in the 'XSL Map' field.

If you have a cluster of application servers it may be convenient to store the XSD file in the EAR file. Copy the XSL file in a subdirectory of the businessobjects folder in the SMP dir. For example D:\IBM\SMP\maximo\applications\maximo\businessobjects\classes\maximodev\xsl.
After having rebuilt and redeployed the maximo.ear file you can reference the XSL file setting maximodev.xsl.MXD-ASSETES in the 'XSL Map' field (without the .xsl file extension).


Test the Web Service

Now launch SoapUI application and create a new project specifying the WSDL link in the 'Initial WSDL' field. Replace the entire content of the sample request with this (setting the correct SITEID).

<soapenv:Envelope
xmlns:soapenv="http://schemas.xmlsoap.org/soap/envelope/"
xmlns:max="http://www.ibm.com/maximo">

<soapenv:Header/>
<soapenv:Body>
<Import>
<Equipment>
<Equipment>001</Equipment>
<Description>My desc</Description>
</Equipment>
</Import>
</soapenv:Body>
</soapenv:Envelope>

You can see that this is just the sample XML wrapped in a SOAP envelope.

References

Using XSLT to transform inbound transactions


Source:http://maximodev.blogspot.com/2014/10/inbound-web-service-processing-using-xsl-xslt.html

Feats From Feet: New Panels Allow Athletes&#39; Footsteps To Power Soccer Stadium

It may seem like just a small step for technology when kinetic foot-pressure-powered tiles can charge some cellphones.  But what about lighting an entire soccer stadium by players' pressing power?  Now, thanks to one company, such a breakthrough is making life better in Brazil.

The Pavegen company manufactures tiles that are pressure-powered to generate electricity.  Already a feature in some European schools as well as at the Paris marathon, the company recently partnered with Shell to create its biggest project yet:  powering a soccer stadium in an impoverished Brazilian favela.

According to gizmag.com, some 200 Pavegen tiles were placed beneath fresh Astroturf, with other tiles along the sidelines. Use of local labor made the project personal to the community. Pavegen's 28 year-old founder/CEO Laurence Kemball-Cook said, "In the two weeks on site in the community, children helped complete the installation. It was a real life science experiment that didn’t stop when school ended for the day."

The tiles will provide up to 10 hours of illumination on a full battery charge, with nearby solar panels aiding the power. The push-powered pitch has been in use for about a month now and has already caused the community to rally for renovations and improvements in the area, showing this has been a great idea from soles to goals.

A pitch that's not pitch black:  Pavegen's tiles prove effective for large-scale illumination.  (Image courtesy goodnewsnetwork.org.)


Source:http://blog.agupieware.com/2014/10/feats-from-feet-new-panels-allow.html

Ashes To Ashes, Sludge To Sludge: Once You&#39;ve Died, Get Liquefied?

Here's some news that's sure to brighten/frighten you for Halloween season:  now, instead of traditional burial or cremation, after death you have the option to be liquified.

It might make your skin crawl, but that's just because you still have skin to worry about.  For those who are planning what they want done with their body when their spirit has hit the road, the new "alkaline hydrolysis" may be the best final answer.  This way, you won't take up too much space or badly impact the environment after you've crossed the finish line in the human race.

According to the mirror.co.uk, the process is simple:  a body is put into a stainless-steel container with water and potassium hydroxide, then pressurized and heated for about three hours, like a creepy crock pot.  A green and brown syrup with an odor like...well, like a dissolved corpse...will be what remains of your remains, as well as a fine white ash.

Yay, my sweet embrace of death will be ecologically friendly!  This totally makes up for all the littering I did in the '50s.  (Image courtesy bioresponsefuneral.com.)


It won't take up the space a conventional burial would, it won't emit various effluvia into the atmosphere like a cremation, and the cask-distilled small-batch human juice won't be accidentally mistaken for shots if you have an Irish funeral.  The you-goo is disposed of by your mortician, but the ash is returned to to whom you bequeathed it, and it can still be kept in a vessel or distributed back to the earth if desired.

So if you haven't got the budget or archers sufficiently skilled in firing flaming arrows for your postmortem party, here is an option for a clean and earth-friendly exit.  Good going!


If there's a way death can be "healthy", this is it.  (Image courtesy snlabetterway.com.) 


Source:http://blog.agupieware.com/2014/10/ashes-to-ashes-sludge-to-sludge-once.html

Hack Lab Intro: How to Set up a Home Hacking and Security Testing Lab

Introduction

This series of articles comprises an introductory tutorial on how to set up a home lab to experiment with common hacking and information security testing tools. Our setup will  allow us to explore the sorts of computer and network vulnerabilities that can be encountered on the internet, and to test the security of our own home computer network and networked devices, all from within an isolated and secure working environment. The series is geared toward individuals who have little or no prior experience with virtualization software or common hacking and security testing tools, but are interested in exploring network and computer security.

Over the course of the tutorial series, we will create two separate network configurations. The first will be a completely virtual environment populated by two virtual guest systems running inside a single host computer. This requires nothing more than an internet connection for the necessary downloads, and a computer with relatively modest RAM and disk resources.

The second configuration will be an everyday local area network of the sort that can be found in many homes, but which is isolated from the internet and where we can strictly control and monitor all network traffic. This setup is slightly more involved in terms of hardware than the first, requiring also a spare router.

Our monitoring and attack system in both configurations will be an instance of a Kali Linux virtual machine running inside an installation of the VirtualBox software package on our primary computer. Kali is a Linux operating system distribution intended for security testing and digital forensics.

In the first completely virtual network environment, our victim will be an instance of  Metasploitable2, a virtual machine that exhibits vulnerabilities that can be found on  everyday computer systems and software configurations. As noted at Offensive Security, "Metasploitable is an intentionally vulnerable Linux virtual machine. This VM can be used to conduct security training, test security tools, and practice common penetration testing techniques."

In the second network configuration, we will use the Kali Linux virtual machine to compromise an everyday local area network router of the sort that can be found on many home networks, in order to demonstrate just how easy it can be to steal login credentials  passed from another computer on the network.

The tutorial is broken down into four parts:
  • Part 1 covers the installation of VirtualBox and provides a walk through of a full installation of a Kali virtual machine on your primary lab computer. Along the way, we'll take a short detour on how to quickly run live Kali sessions without a full installation of the machine.
  • Part 4 provides details on setting up our second network configuration, which models an everyday home local area network. With the attack machine, we'll conduct a simple man-in-the-middle attack against the network's router, and demonstrate a serious security vulnerability by stealing login credentials sent to it from the victim machine, in this case, the host computer. 

Source:http://blog.agupieware.com/2014/10/hack-lab-intro-how-to-set-up-home.html

Jumat, 28 November 2014

Hack Lab Part 1: Installing a Kali Linux Virtual Machine in Virtualbox

In this article, which is the first part in our tutorial series on how to set up a home hacking and security testing lab, we will walk through the creation and installation of a Kali Linux virtual machine inside VirtualBox. This system will then function as our main monitor and attack machine in subsequent tutorials. After setting up the virtual system, we will:
  1. run a live Kali session
  2. do a full install
  3. update the system
  4. install the VirtualBox Guest Additions
  5. configure appropriate user accounts
  6. and finally switch over to a bridged network adapter in preparation for the next tutorial in the series
The whole process may take a few hours to complete, more or less, depending on the specifics of your own situation, ex. computer, internet connection speed, and so on. This session took me about three hours from beginning to end.


Virtualization
There are a number of different free virtualization packages available online. For this tutorial series, we've chosen to go with VirtualBox because it's open source, beginner friendly, and there is a lot of documentation and support information that can be found for it online, especially regarding the systems that we will be installing. For example, since Kali and Metasploitable are derived from the Debian Linux distribution, support information on other Debian-based operating systems such as Ubuntu or Crunchbang is often also applicable to Kali and Metasploitable, as we shall see in this and subsequent articles.

The first step is to download and install the VirtualBox software package onto the primary computer chosen for your lab setup. Make sure you download the right version for your operating system and hardware architecture (32 bit vs. 64 bit). Instructions for installation on various operating systems are readily available if you run into any snags. Also make sure to keep a handy copy of the VirtualBox user manual, which comes packaged with the software and can also be found online.

Once you install VirtualBox and run it for the first time, you'll be presented with the application's welcome prompt, which provides an orientation for the interface. Poke around in the menus to get a feel for the software.

Next, download a copy of the Kali Linux operating system .iso disc image. Again, make sure you download the proper ISO file for your computer's architecture. Depending on the speed of your internet connection, this may take some time, as both the 32 bit and 64 bit files are 3GB in size. Kali's documentation can be found here.

As Kali is a security sensitive system, once you have downloaded the file, it is recommended to check its SHA1SUM hash value against the one supplied on the download page to make sure the file had not been corrupted in transit. For more on how to check a file's hash value, follow the link to our previous article providing an overview of the process.

If you plan on playing around with a number of different virtual guests on your computer, it is probably a good idea to create a permanent folder somewhere on your system where you will keep all the necessary operating system .iso files.

Creating a Virtual Machine
Now let's return to VirtualBox and set up the virtual machine on which we will install the Kali operating system. Open VirtualBox and click "New". Provide a name for your Kali virtual guest system. Choose Linux as the type and Debian as the version, since Kali is derived from Debian Wheezy. As you can see below, I'm using the 32 bit version. Click Next.


Choose the amount of memory you want to allocate to the virtual instance once it is up and running. In my experience, Kali can use a lot of RAM, and the computer I'm running it on has a fair amount to spare, but for now I'm going to leave it at the default of 512MB.  You can also adjust these settings later to optimize them for your own setup. In my experience, Kali runs pretty well in VirtualBox even on a laptop with only 4GB of RAM, though you may have to conserve by shutting down memory intensive applications running on the host computer. After you've set your memory size, click Next.


Choose whether you want to create a virtual hard drive for the virtual machine. We're going to need one for our home lab, so check "Create a virtual hard drive now", then click Create.


For the "Hard drive file type", check "VDI (VirtualBox Disk Image)", then click Next.


In the "Storage on physical hard drive" window, you'll probably want to choose "Dynamically allocated." This means that space will not be taken up on your physical hard drive until it is actually written to the virtual disk. If you choose "Fixed size" then the virtual disk drive will take up a set amount of space on your physical hard drive even if that space has not been written to by the virtual machine. Click Next.


In "File Location and Size," choose where you want the hard drive files for the virtual system to be stored by clicking on the folder icon. I just use the default folder. This is where VirtualBox will store all files related to your virtual machine. Also, on this screen you may increase or decrease the amount of hard drive space you want to be allocated for the virtual instance. 8 GB is the default. I'm going to push mine up to 10 GB. Click Create.


The new virtual system should now appear in your Virtualbox interface. As you can see I have three folders in my left sidebar, and have placed the kali1 instance I just created into a new "lab" group. In the main interface we can see the settings for the new systems, which are a mixture of defaults and configuration settings we determined ourselves in the creation phase. Before starting up the instance for the first time, I usually adjust a few settings first.


Click "Settings" for your new virtual machine. I'm going to add a description under the General menu, because I have other Kali instances on my computer.


In the System menu, under Motherboard, I uncheck "Floppy" in the boot order.


Also in the System menu, under the Processor sub-menu, we have to check "Enable PAE/NX" for Kali to operate properly.


Finally, under the Display menu, I add more Video Memory to the default 12MB, bumping it up here to 36 MB to start. Again, this can be adjusted later to optimize your particular setup.


That's it for now. Browse through the other menus. Notice in the Network setting we can add up to 4 different network adapters for our virtual machine. Later we will play around with the network setting, after we've fully installed the Kali operating system. For now, a single network adapter running on NAT (i.e. Natural Address Translation) will suffice for our purposes.


Click "OK" to save your changes.

Fire up your new machine by double clicking it, or single clicking it and then clicking Start. You will be prompted to "Select start-up disk". We now have to choose the startup disk for our new virtual machine. This is the Kali .iso file we downloaded earlier. Click the folder icon and navigate to the folder where you've stored the Kali .iso file on your host computer. Select it, then click start.


Booting into a Kali Live Session
Kali should boot as if you were booting a real physical machine from a cd with the Kali operating system file on it. Notice that if you click inside the guest window, your mouse pointer will be "captured" by the guest. From then on, your keyboard and mouse activity will control the virtual machine. To switch back to using your host machine, you have to hit the host key, which by default is Right-Control on my computer. It may be different depending on your operating system. The Virtualbox interface will tell you what the "Host Key" is in the bottom right of the window.


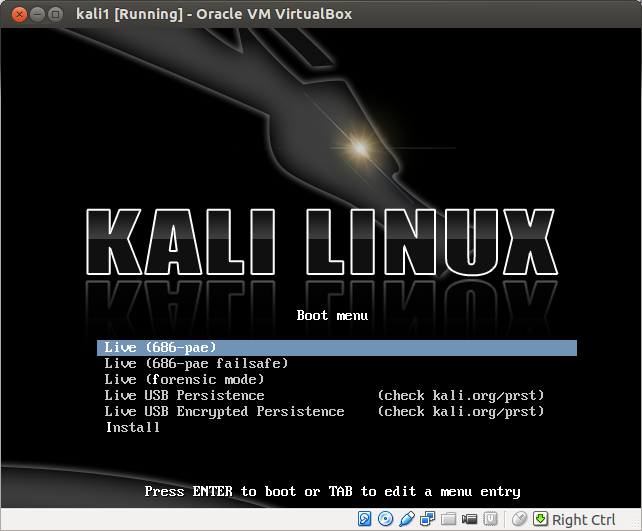
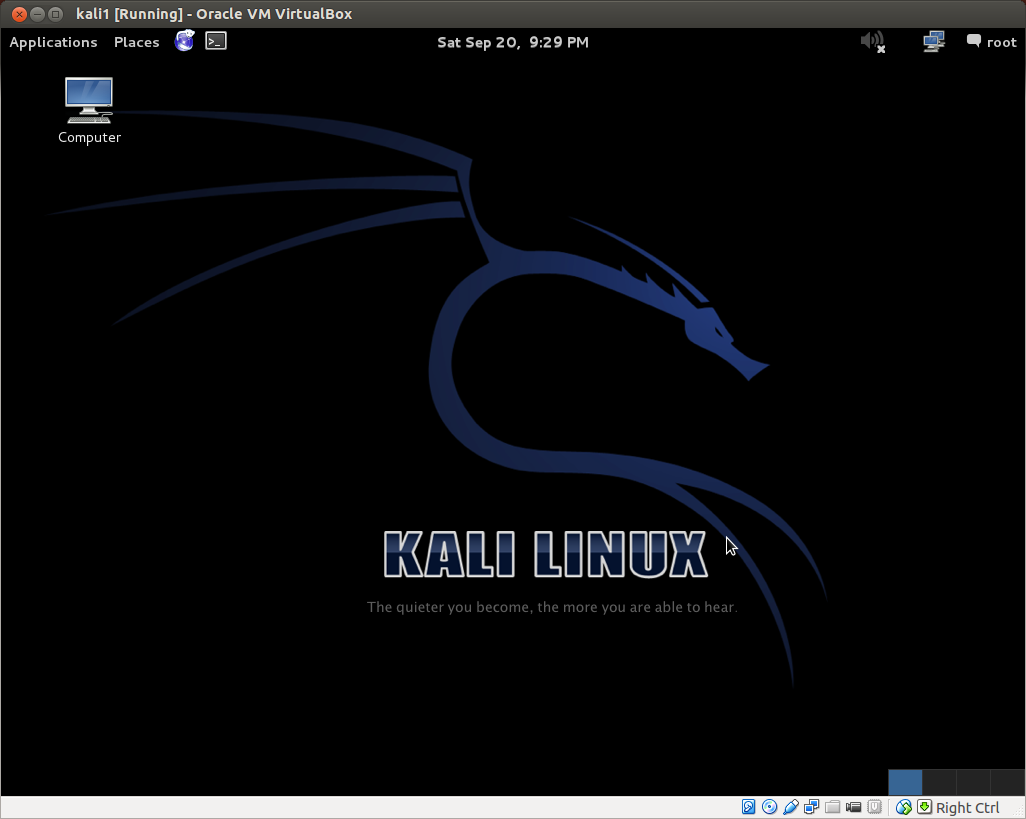
From this menu, you can boot into a number of different types of live session, or you can do a full install of Kali on the virtual hard drive we previously created inside Virtualbox. As we shall see, there are numerous advantages to doing a full install of Kali for the purposes of our home hacking lab, but one of the advantages of a live session is that we can jump right in without any further configuration. Let's select the default Live session. Here is the Kali Desktop after booting into live session (note the time and day, yes, this is how I prefer to spend Saturday evening):


You will soon notice that there are certain limitations to the virtual machine's interface. For example, your mouse wheel will not work, you cannot enlarge the size of the screen, or go full screen, there is no tab completion in the terminal, and there are other interace issues as well. This is not a limitation of the live session, or Kali itself, but rather of the virtual machine we've created. However, all these issues can be addressed by installing the Virtualbox Guest Additions, but we'll save that for our future full install of the system.

Notice also that there are limitations to the default NAT networking interface. Under NAT (natural address translation) the Kali guest is not treated as its own independent node on the wider local area network. It does not have an independent ip address on the local area network. Its virtual ip address is translated by the ip address of the host machine. This can be addressed by adding a second network adapter to the virtual system or changing the present one, as we shall see later on.

However, despite these limitations, you can already begin exploring the ridiculous number of tools that come bundled with Kali. Here are Kali's Top Ten Tools:


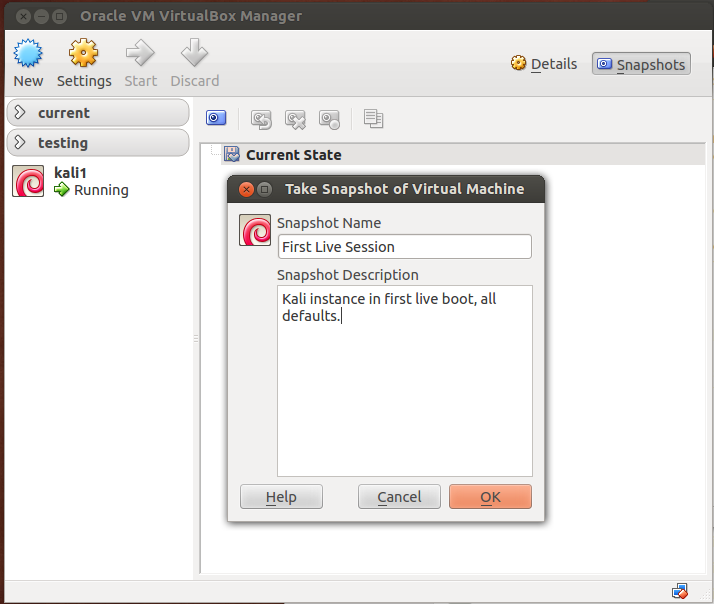
Since all appears to be working well, let's take a snapshot of the virtual machine. VirtualBox snapshots are a way to keep a log of your virtual machines in a given state. If you are experimenting with a new configuration, and everything suddenly goes to hell, you can always revert back to your previous snapshot like nothing happened. Go to the VirtualBox interface window, select your Kali guest, click "Snapshots" in the upper right. Take a snapshot by clicking on the camera icon. Name the snapshot, and give it a description. Now, if we seriously screw up something on the machine, we can always just revert to this prior state of the system.


Now let's reboot to do a full install. Click the root menu item in the top right of the Kali Desktop window. Then choose reboot or do a full shut down and boot from the VirtualBox interface. In the process, you will be prompted to remove the disk from the system. Of course, we are using a virtual disk image, so there is no physical disk that needs to be removed. Just click enter to continue. Now reboot . . .  OH NO!!!!! "FATAL ERROR: No bootable medium found! System failed."


If you've been following along thus far, you've likely just been delivered this disturbing warning by your virtual machine upon reboot. It's a good thing we took that snapshot! Actually, this was only to be expected. Remember when you had to remove the virtual disk from the machine upon shutdown or reboot? Well, we now have to re-insert the virtual disk, that way we can reboot into Kali and move on to a full install of the operating system. So solve this "Fatal Error," with your virtual machine still running:
  1. Point your mouse toward the Oracle VM VirtualBox application menu on your host machine and find the Devices dropdown menu
  2. Select "CD/DVD devices"
  3. Select "Choose a Virtual CD/DVD disk file..."
  4. Select or navigate to your Kali .iso operating system file
  5. Close the virtual guest by exiting the window and powering off the machine 

After the machine closes down, restart it from inside VirtualBox, it should boot into Kali from the newly inserted virtual disk.

Full Installation of Kali in VirtualBox 

Now let's move on to our full installation of the Kali virtual instance. Once your system reboots into the main menu, choose the Install option and hit enter.


The installation process will begin straight away. Note that over the course of the installation, the various menus are not graphical interfaces. You cannot point and click, you have to enter info via the keyboard, and use the arrow keys to navigate. We're not going to do anything fancy here for the purposes of this simple home lab setup. In most cases the defaults will suffice. Simply follow the directions on each page. This process took about an hour on my computer. Here's the first screen:


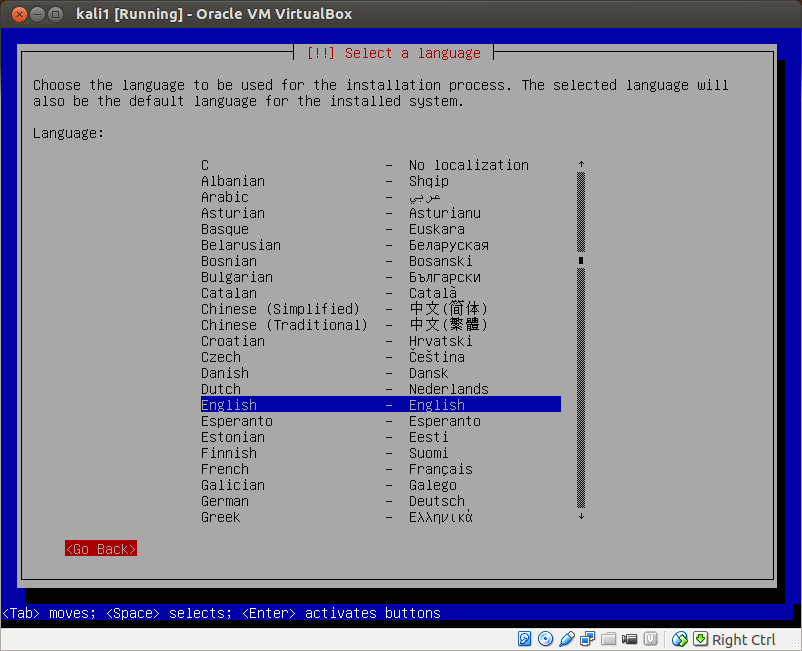
  1. Choose your language.
  2. Select your location.
  3. Select your keymap.
  4. Enter the new host's name. It simplifies things to choose the same name you chose for your VM inside VirtualBox, but these need not be the same name. You can also always change both names later if you so wish.
  5. Enter a domain name. I'm going to leave it blank and hit enter.
  6. Enter a root password, then re-enter to confirm. These will be the credentials for the root super-user on the system. Be sure to make a note of the password you've chosen.
  7. Select your time zone.
  8. Partition Disks, select 'Guided - Use Entire Disk'. Not to worry, here 'Entire Disk' means the virtual hard drive we created upon initial setup of the VirtualBox machine. In my case, this will eventually claim up to 10GB on my harddrive, as this was the size I specified when I created the VM.
  9. Select disk. This is the virtual hard drive we configured earlier.
  10. Select partition scheme. Let's choose default, all files in one partition.
  11. Confirm selections, or go back if necessary.
  12. Select yes, to commit the changes by writing them to disk.
  13. Select network mirror if any. None is needed for this home lab setup.
  14. Select proxy if any. None is needed for this home lab setup.
  15. Install grub boot loader (default).
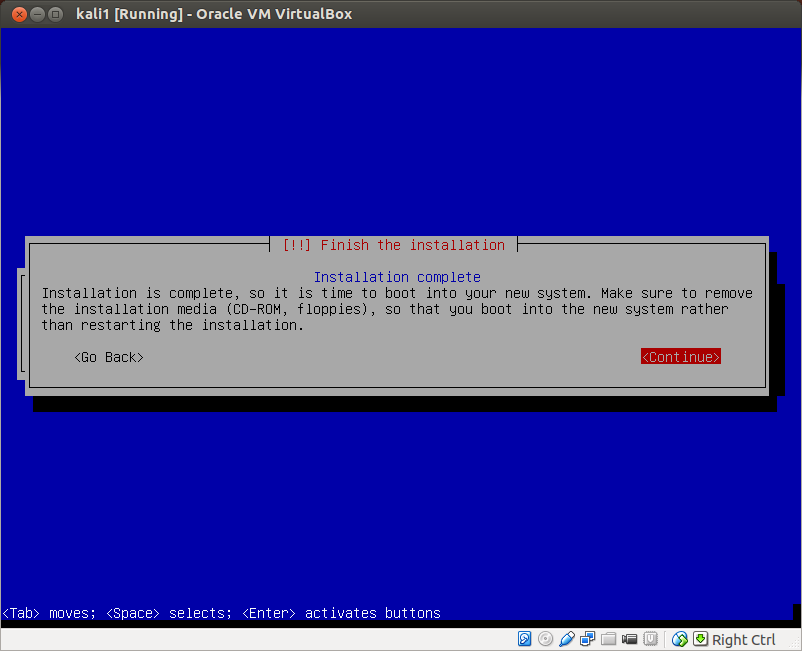
  16. Installation complete! Select continue.

Let the machine do its thing, and then reboot the system. Upon reboot, log into kali using 'root' as your username along with the password you chose for root during installation.

Congratulations, you now have a virtual instance of Kali Linux installed on your computer! But we're not done with our configuration of the new virtual machine just yet. We still have to update the software on the system, and then we're going to install the VirtualBox Guest Additions in order to enable full screen mode, tab completion in the terminal and so on. This process might take you another hour or so, depending on your internet connection.

Updating Kali and Prepping for Guest Additions
If your host computer is connected to the internet, you should have internet connectivity from inside your Kali VM over your NAT adapter. You can check this by opening up the bundled Ice Weasel browser and making sure you can get online. Ice Weasel can be opened by clicking the icon next to the Places drop down menu in Kali. You can also try pinging google.com or some other website from inside a terminal. You can open a terminal by clicking the terminal icon next to the Ice Weasel icon. We are going to need a working internet connection to update the system.

Let's update the system. Open a terminal in Kali and enter the following command:
apt-get update
This will make sure Kali checks the most recent repository for any software updates. Once this process completes, enter:
apt-get dist-upgrade
This will update all software on the Kali system. Depending on your internet connection, this may take some time. The process lasted around 15 minutes for me this time around. Once that is complete, you now have a fully updated Kali virtual machine. But we are still lacking some basic functionality, so now we're going to install the VirtualBox Guest Additions.

Installing Guest Additions in VirtualBox can be tricky. To prepare the system to handle the Guest Additions, we have to run a couple more commands inside the terminal, so open up a new terminal shell and run the following series of commands, one after the other, after each completes:
apt-get clean
apt-get autoclean
apt-get update
apt-get install build-essential linux-headers-`uname -r` dkms
Notice that `uname -r` is inside backticks, not single quotes in the final command here. Yes, this matters. The backtick key should be located just above the tab key on your keyboard. This series of commands was suggested on this CrunchBang forum post, and it has yet to fail me in setting up Guest Additions for a Debian-based machine inside VirtualBox. Once this process has completed, we can now install the Guest Additions themselves.

Installing VirtualBox Guest Additions in Kali
While engaged in the Virtual system, in the Oracle VM application menu, go to the Devices dropdown menu again. Notice the "Insert Guest Additions CD" option. Select it. You will get a pop-up inside Kali asking you if you want to run the file. If it succeeds, great! If not, that's not a problem. In my experience, it has never worked off the bat, so I click cancel.


Selecting the "Insert Guest Additions CD" menu option has inserted a virtual disk into your virtual machine. The files on this disk can be found in the folder: /media/cdrom/. Confirm that they are there by navigating to this folder in the graphical file system manager or in a terminal.

To install the Guest Additions for Kali, we need to run the VBoxLinuxAdditions.run file on the Guest Additions cd. However, you cannot simply run the file from the /media/cdrom/ directory. First we need to copy it and change its permissions.

Copy the file to your Desktop from inside a terminal with the following command:
cp /media/cdrom/VBoxLinuxAdditions.run /root/Desktop
You should see a copy of the file appear on the Desktop.  Change to the Desktop directory inside the terminal:
cd /root/Desktop
Change the permissions on the file with the following command:
chmod 755 VBoxLinuxAdditions.run
Run the additions file:
./VBoxLinuxAdditions.run
Success? Success!


If you experience any snags along the way here, you'll have to do some trouble shooting. There is a ton of info online regarding installation of Guest Additions in VirtualBox VMs, likely in large part because the process can be tricky. Remember also, that support info for other Debian-based systems such as Ubuntu and CrunchBang will also apply to Kali in many cases. But the series of commands above has yet to fail me.

Upon successful installation of the Guest Additions, we have to shut down the machine for the updates to take effect. Reboot and log in as root again. Once the system reboots, the simplest way to confirm that the Guest Additions have been successfully installed is to see if you can maximize the window for the guest system. You should now also have code completion in the terminal, among other things. You can now eject the Guest Additions virtual CD from the Virtual cd drive. Click the Computer icon on the Desktop, then click eject under the devices menu.

We now have a fully updated fresh install of a Kali virtual machine with the VirtualBox Guest Additions installed. Let's shut down the machine, take a snapshot and switch the network adapter into bridged mode in preparation for the next tutorial.

Switching to Bridged Networking
After the VM has shut down and you've taken your snapshot, open up the settings of your new virtual system and go to the Network menu. Unless you've already chaned these settings, you should have network Adapter 1 enabled, and attached to NAT. Change the attachment to a bridged adapter. This will allow our guest to act as an independent host on our local network, rather than have its address translated by the host computer the virtualization software is running on.


Finally, the adapter Name has to connect up to the appropriate network adapter of the host machine, i.e. the one that is actually connected up to your local network, whether it is a wireless connection, an Ethernet connection, or whatever. The appropriate one should be selected by default. Click Okay.

Start up the guest. Open a terminal and ping a known website or host, or use a browser to visit a web page. If it works, CONGRATS! You're in bridged mode.

If you have no networking capability, and can't even ping other computers on your home network, let along a website. You have to do some trouble shooting. Here are some troubleshooting questions:
  • Are your networking settings correct in VirtualBox?
  • Is the adapter for the guest machine connected to the right interface on the host computer?
  • Is Kali's /etc/network/interfaces file structured properly?
  • Is the appropriate interface up as indicated by ifconfig?
  • Have you tried restarting Kali's networking service?
  • Is Kali's /etc/NetworkManager/NetworkManager.conf file structured properly?
  • Have you tried restarting the network-manager service?  
As the old saying goes, when all else fails, read the manuals!  

Setting up an Administrator Account
If you've followed along this far, you are now logged into your Kali VM as root, have a fully updated system, and the VirtualBox Guest Additions installed. It is not good to get into the habit of running everything in Kali as root. Best practices dictate setting up an administrator account and using sudo to run security-sensitive commands.

Create an administrator account by going to the root dropdown menu in the top right of the Kali Desktop. Then select: root => system settings -> user accounts -> create an administrator account. Create an administrator account with a separate password.  Then log out, and log back in with your new admin account.  Using an administrator account such as this creates a bit of extra work (ex. having to use sudo for otherwise everyday commands such as ifconfig, having do to a bit of extra configuration for applications such as Wireshark and Zenmap), but it is a good habit to get into so as to avoid becoming careless with the root account. After setting up an administrator account, shut down the machine and take another snapshot.

In part two, we will use two tools bundled in Kali to explore your home local area network. Thanks for following along. As always, leave any questions or comments below. 

Source:http://blog.agupieware.com/2014/10/hack-lab-part-1-installing-kali-linux.html

Hack Lab Part 2: Exploring Your Home Computer Network with Kali Linux

This article is part two in our tutorial series on how to set up a home hacking and security testing lab. If you followed along in part one, installing a Kali Linux virtual machine in VirtualBox, you have installed VirtualBox on the primary computer for your home lab and created a Kali Linux virtual guest on this host machine. The Kali system has been fully updated and VirtualBox Guest Additions have been installed on it. Finally, your Kali VM has a single network adapter running in bridged mode and you have set up an administrator account on the Kali instance. 

Creating and configuring the virtual network setup outlined in the introduction, which we will do in part three of this series, requires a few more steps: we still have to download and install Metasploitable, set up the virtual network, etc. But if you're like me, you're probably already itching to start playing with all the toys Kali has to offer, if you haven't already!

Home Network Analysis 101
This article will show how some of the tools that come bundled in Kali can be used to explore your existing home computer network, and test whether you can successfully identify all the devices that are connected to it. In particular, we'll take a look at a set of tools that come bundled in Kali that can be used for network analysis: nmap/Zenmap and dumpcap/Wireshark.

These will come in handy in our eventual testing lab, but they can obviously also be used to explore your home local area network as well. Nmap is a command line network scanner, and Zenmap is a graphical interface to nmap. Dumpcap is a command line network traffic monitor, and Wireshark provides a powerful and versatile graphical interface to monitor network traffic and analyze network packet capture files.

Here's a simple experiment. Do you happen to know how many devices are currently connected to your home network? Can you identify all of them off the top of your head? Try to do so, and make a list of them. At the very least, we know there will be at least three: the Kali guest, the host machine you are running Kali on, and your router. There may also be more computers or cell phones connected to it, and maybe even your television, refrigerator or coffee maker!

We are first going to use nmap to see if we can identify any such devices on the network, and perhaps detect one or two that we did not think or know were connected to it. We'll then configure Wireshark and run a packet captures to get a sense for the normal traffic on the network, and then run another capture to analyze just how an nmap network scan works.

Determining Your IP Address
Before we can scan the network with nmap, we need to identify the ip address range we would like to examine. There are a number of different ways to determine your ip address on a Linux distribution such as Kali. You could use, for example, the ip or ifconfig commands in a terminal: ip addr, or sudo ifconfig.

(Note that if you are using an administrator account inside Kali, which is considered a best practice, when a non-root user enters a command such as ifconfig into a terminal, the shell will likely respond by complaining "command not found". In Kali, sensitive system commands like ifconfig have to be run as root. To access it from your administrator account, all you need to do is add "sudo" to the front of the command: sudo ifconfig.)

These commands will provide you will a wealth of information about your network interfaces. Identify the interface that is connected to the LAN (likely eth0), and make a note of the ip address indicated after "inet" for the ip addr command, or after "int addr:" for the ifconfig command. That is your ip address on your local area network. Here are a couple ifconfig and ip addr outputs posted by the Ubuntu Journeyman:


As you can see here, the ip address for this machine is 192.168.1.4.5. Yours is likely something similar to this: for example, 192.168.1.123 or 10.0.0.56 etc. Notice in the ip addr output above, the ip address is: 192.168.4.5/24.  That means 192.168.4.5 is the ip address of that specific machine, while the /24 at the end indicates the address space for the LAN's subnet, which in this case are all the addresses from 192.168.4.1 to 192.168.4.255.

If we were to scan this local area network with nmap, we would want to scope out all the addresses in the network's range, which means 192.168.4.1, 192.168.4.2, 192.168.4.3, 192.168.4.4, and so on, all the way to 192.168.4.255. One shorthand way of notating this is: 192.168.4.1-255. Another common shorthand is 192.168.4.0/24.  Of course, if your address were 10.0.0.121, then the shorthand would be: 10.0.0.1-255 or 10.0.0.0/24. 


Host Discovery
Let's assume your Kali VM has the ip address 192.168.1.5 on a subnet with possible host addresses from 192.168.1.1 to 192.168.1.255. Now that we know Kali's ip address and the address range we want to take a look at, open up a terminal and type: nmap. This will provide you with a long list of all the options available within the nmap program. Nmap is a powerful program and there are a lot of options! Perhaps the simplest possible network scan that can be conducted with nmap is a ping scan, for which we use the -sn option.

Now type nmap -sn 192.168.1.1-255 into your terminal and hit enter. (Don't forget to substitute the address range for your network if it is different from this!) This scan will tell you how many hosts nmap discovered by sending a ping echo request to each of the addresses in the range x.x.x.1-255, and provide you with a list of the ip addresses of the hosts that returned a ping reply. This is host discovery 101. Here is the ping scan output from nmap on a simple local area network I set up for the purpose:


The ping scan found 5 hosts up with the addresses: 192.168.1.1, .2, .3, .5 and .6.  Note that in the wild, this method of discovery may not work, as it is becoming increasingly common for administrators to configure their systems so that they do not reply to simple ping echo requests, leaving a would-be ping scanner none-the-wiser about their existence.

Did your scan find the same number of hosts that you had presumed were on your network? Were there more or less?

We can use the default nmap scan to further investigate known hosts and any potential ghost hosts the ping scan may or may not have uncovered. For this, simply remove the -sn option from the command above: nmap 192.168.1-255. Here's the output of the default nmap scan on the same network as above:


Nmap has returned much more information. It found three open ports on the router at 192.168.1.1, as well as an open web server port on host 192.168.1.2.  All scanned ports on the remaining hosts were closed.

You can also use nmap to further investigate known hosts. The -A option in nmap enables operating system detection and version detection. Pick out a couple of the hosts discovered by your nmap scans, for which you already know the operating system type and version. Now scan these hosts with nmap for OS and verstion detection by adding them to your host address target list, separated by commas.  For example, if I would scan the router and web server discovered above for OS and version detection with the command: nmap -A 192.168.1.1,2. This will return more information, if any is determined, on those hosts.

You can obviously also run an OS and version detection scan over the whole network with the command: nmap -A 192.168.1.1-255. Depending on the number of hosts on your network, this scan could take a couple minutes to complete. If you press <Enter> while the scan is running, it will give you an update on its progress.

If there are more and a handful of hosts on your network, the output can be hard to parse in the terminal. You could send the output to a file with:  nmap -A 192.168.1.1-255 > fileName.txt. Or you could use one of nmap's own built-in file output options.

But this is also where Zenmap comes in quite handy. Open up Zenmap from Applications->Kali Linux->Information Gathering->Network Scanners. If you are running as an administrator and not root, as you should be, you will get a message stating that not all of nmap's functionality can be accessed without root privileges. Root is not necessary for basic scans. However, you can run Zenmap as root by opening a terminal and typing: sudo zenmap. The Zenmap interface:


The Zenmap interface is pretty straightforward. Enter the target ip address or address range into the target field. Changing the scan profile from the drop down menu changes the scan command. You can also manually enter or edit commands in the command field. After you run a scan, Zenmap also helpfully breaks down the results for you, providing host details, port lists, network topology graphics and more.

Play around with the various built-in scan types. Can you identify all the hosts on your home network with a ping scan? a regular scan? an intense scan? Can you identify all the open ports on those hosts? If you have a laptop or another device that you frequently use to connect to the internet over public wi-fi hotspots, you can also do intensive scans of those devices to determine if there are any open ports that would represent a potential security vulnerability. Identifying open ports is important for vulnerability assessment, because these represent potential reconnaissance or attack vectors.


Network Traffic Capture and Analysis with Wireshark
Nmap scans a network and probes hosts by sending out ip packets to, and inspecting the replies from, its target at a given address. With 255 addresses to scan along with 1000 ports on all discovered hosts in the default scan of the subnet above, that's a lot of network traffic! What does the packet traffic generated by a scan look like on the network?

To answer this question, we can use Wireshark and dumpcap. Dumpcap, as its name implies, is a command line tool that dumps captured network traffic. Wireshark provides a graphical user interface to analyze these sorts of dump files, which are collections of all the network traffic to which the given network interface was privy.

If run with the proper privileges, Wireshark can capture live network traffic as well. In Kali, you can find Wireshark under: Applications->Kali Linux->Top 10 Security Tools. Unless you have already configured Wireshark with the appropriate settings, when you open it for the first time you will be informed by the "Capture" panel that "No interface can be used for capturing in this system with the current configuration."


In its documentation, Wireshark recommends appropriate settings to enable capture privileges. This also suggests confirming that Wireshark can also be run as root. To run Wireshark as root, you can log in as root, or run sudo wireshark in a terminal. When you run Wireshark as root, you will first be given a usage warning and provided with sources for how to set up proper privileges. This forum post on AskUbuntu boils the process down to three simple steps.

Now that you've enabled live captures in Wireshark, let's run one! Click "Interface List" in the Capture panel of the default view. Choose the interface that is connected to the network (it will indicate your ip address on that network), and click Start.

This will immediately begin a live capture of all the packets on the network to which the interface has access. At the very least, it will detect: 1) packets it sends out, 2) packets it receives directly, 3) packets it receives indirectly if they are broadcast to all the hosts on the network.

If you have never viewed a network packet capture before, you may be surprised what you can see, and what information is simply being broadcast over the network. You'll probably find messages from your router, you'll see internet traffic packets if you are viewing a webpage in a Kali browser, or on Kali's host computer (depending on whether or not Promiscuous Mode is enabled in the VirtualBox advanced network settings for your Kali machine). You might find that one device is especially chatty for no good reason. There might be devices pathetically sending out calls to other devices that have been removed from the network, such as a laptop searching for a printer that has been turned off, and so on.

The default Wireshark packet capture interface numbers each packet it captures, and then notes the time after the capture began that it received the packet, the ip address of the source of the packet, the ip address of the destination of the packet, the protocol, the packet's length and some info. You can double click an individual packet to inspect it more closely.

If you ping your router (which you should have been able to identify via nmap analysis) from Kali, you'll see all the requests and replies, obviously, since the Wireshark capture and the ping are running on the same machine. But the Kali guest shares its interface with the host machine. If you enable promiscuous mode in the advanced network settings inside VirtualBox for your Kali instance, when you ping your router from the host machine itself, the Wireshark capture will similarly allow you to see all requests and replies, they're going over the same interface! If you disable Promiscuous Mode, on this other hand, this will not be the case. In this case, packets to and from the host computer will not be picked up, as if it were a completely separate physical machine. Similarly, if you ping your router from a different computer, you will not see the request/reply traffic at all, though perhaps you might pick up an ARP if the requester does not already know the (hardware) address of the request's intended recipient.

After getting a feel for what the base level network traffic looks like on your network, start a new capture, and then run a simple scan from nmap or Zenmap, and watch the result in Wireshark. When the scan is finished, stop the capture and save the file. Capturing the simple nmap ping scan from above on my network resulted in a file with over 800 packets! Now you can analyze the network traffic generated by the scan itself. You'll probably want to play around with Wireshark for a bit to get a sense of what it offers. There are tons of menus and options in Wireshark that can be tweaked and optimized for your own ends.

Well, that's it for this article. In part three of our hack lab tutorial series, we'll install our victim machine, an instance of Metasploitable2, in VirtualBox and set up a completely virtual lab network to explore some more tools that are bundled in Kali. As always, comments, questions, corrections and the like are welcome below.

Source:http://blog.agupieware.com/2014/10/hack-lab-part-2-exploring-your-home.html